Saturday 26 September 2015

Some More Projects!

I can't believe I am actually saying this, but I think it is true:  I think I am officially done sewing both the Blossom Bag and the Necessary Clutch Wallet.  Both are fantastic patterns;  there is absolutely no question that I adore the designs of both!  I thoroughly enjoy the complexity of both projects.  I have made both patterns multiple times, and I actually think I've reached a point where they're just not that much fun anymore.  The proof is in how long it took me to complete this project:  I started it about a year ago, and had just the last three steps to do to the Blossom Bag, and just kept postponing it, as I somehow wasn't motivated to finish it.  The difficult parts were done, so the challenge was over, and I was consequently bored with the project.  Finally, I took a deep breath, and finished the last three steps (in less than half an hour).  

So, here they are;  this is probably the last Amy Butler Blossom Bag that I'm going to make (for a long time, at least).  Fittingly, this one is made of blossom-print fabric.  I fell in love with this fabric about two years ago, and bought a chunk (can't remember how much of it now!), knowing that it would ultimately become a bag of some kind.  And it did!  


As for all the previous Blossom Bags that I have made, I did the usual strap attachment modification (which is just neater than the intended version), as well as the alternate attachment of the purse flap, which I explained more thoroughly in a previous post about the same pattern).  In addition, I think this one is made at a different size to my usual reduced size versions;  I believe this one is at 90% of the original size.  Despite the fact that this is the FOURTH time I've made this pattern already, it still took HOURS to complete.  There's just no getting around it:  this pattern has a LOT of pieces, and is fairly fiddly to assemble.  
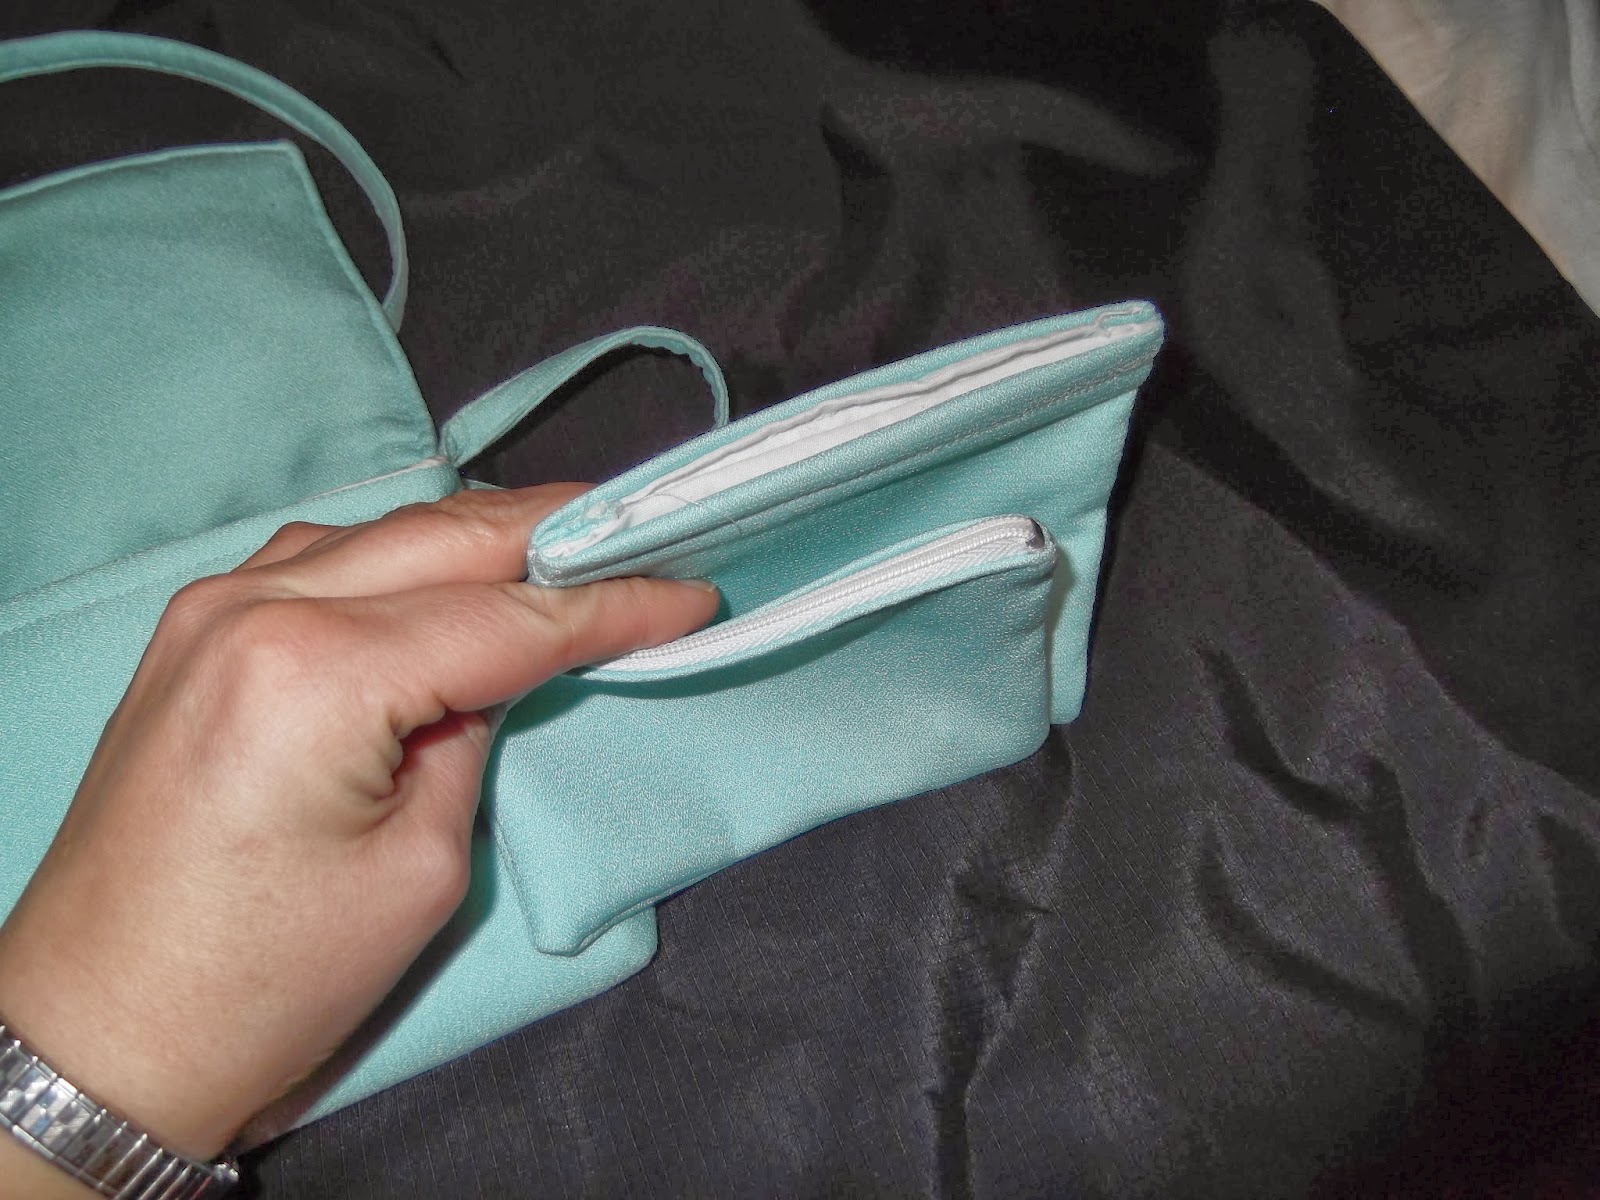
I included two additional modifications.  This purse includes two zippered compartments, rather than just one.  I found that the single zipper just looks a bit unfinished, whereas the double zipper looks better.  (Personal preference).  
I also included a very neat (if I do say so myself!) welt pocket in the back of the purse.  I had intended to include a welt pocket, and hadn't yet decided on the size.  Surprisingly, this measurement was ultimately "dictated" to me, as I used the last remaining pieces of the lining fabric to make it.  Well, that was an easy decision!  I am truly chuffed with how it came out.
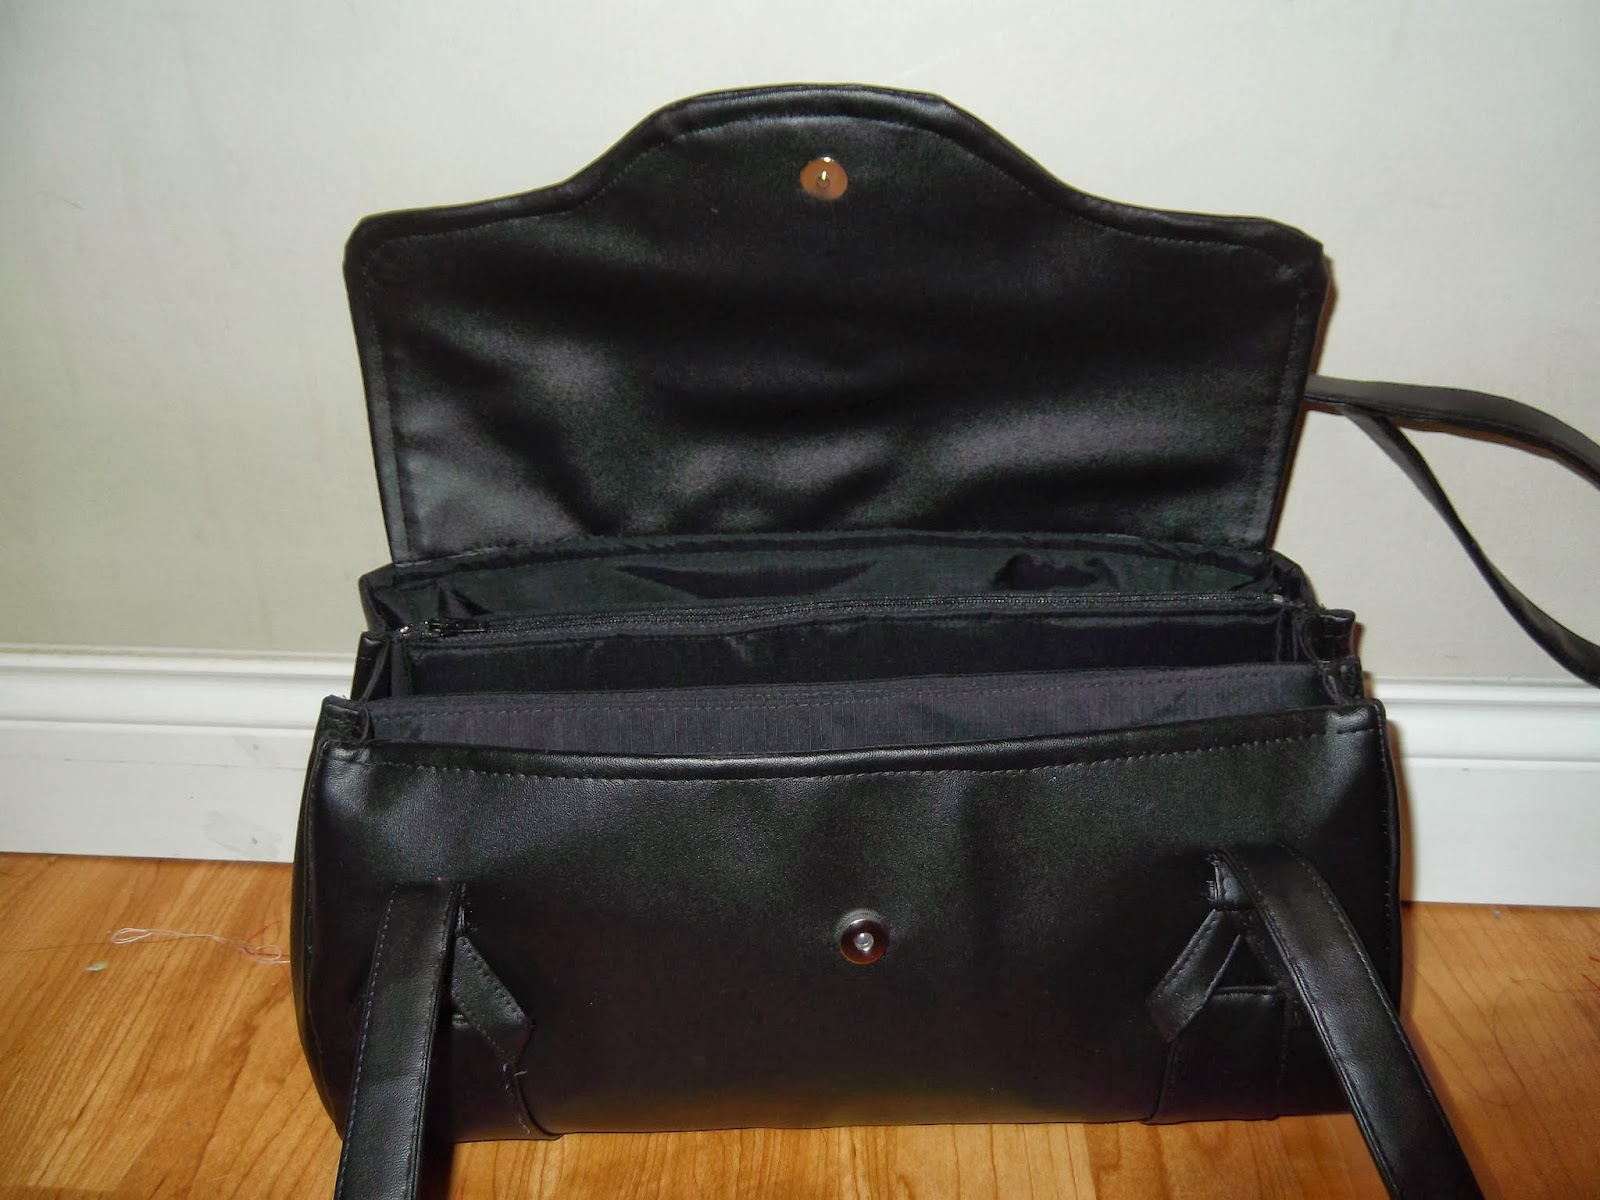
The closing mechanism on this purse is different to the recommended magnetic snap:  I used a twist-lock instead, because that works best on the NCW, and I did want them to match. 
The last difference is that this bag is finished with gold top stitching.  I used a fine zig-zag stitch (buttonhole setting) to accomplish the row of golden top stitching on the front flap's border.  In addition, there's a single row of golden top-stitching around the handle attachments.  I selected the gold because the fabric has quite a bit of gold in it:  each flower is outlined in a thin line of gold!

Here they are together:  Blossom bag at the bottom, and Necessary Clutch Wallet on top.

And finally,  here's the Necessary Clutch Wallet on its own.  I do love this pattern.  I adore every feature of this design, because it's just SO perfect!  I installed a matching twist lock onto the purse.  In the same way that I top-stitched certain features in gold on the Blossom Bag, I did the same for the NCW.  I think it adds to the purse, and makes it look that much better!  

I'm really impressed with this pair.  They're going to be gifts for someone;  I hope she appreciates them :)  

Wednesday 29 January 2014

Travelling Adventures - Part 1

Okay, so here's a post of a different kind.....

Some time ago, my sister introduced me to the website showmystreet.com.  I forgot about it, then looked it up again last night when I needed to give someone directions, and wanted a screen-shot of a location.  Since my last visit to the website, I see that there have been some upgrades.  Consequently, I think one website will change my evenings for the next while!  Television is no longer interesting.  I am hooked on geography.

If you go to the website showmystreet.com, you'll see that it's much like Google Earth, except web-based, which seems to be faster on my laptop.  I also prefer the interface.  So, why, you might rightly ask, am I spending my evenings hooked on a website?  Well, it's simple, really...  it's virtual travel!!  It's not just looking at things from an aerial view.  It's a full virtual tour of some places.

This evening I decided to tour the Vatican City.  I recommend this trip!  (Of course, I would much rather visit in person, but as my finances and schedule are at odds with my travel desires, this way will have to do).  I started off at the very top of the Cathedral, and got to move down, scanning the gorgeously ornate artwork from bygone eras.  There were "other" tourists everywhere!  I stretched my Latin comprehension to try to read the inscriptions on the walls.  I recall some words, but can't really piece the meanings together.  I guess that's what happens when one does not revisit one's undergrad studies for a decade.  (Goodness - it really HAS been a decade since I took Latin!)  I don't know if I've ever really marvelled at a ceiling before.  In Las Vegas, I certainly took note of the ceilings, but by contrast, those were just huge, whereas these are majestic, somehow.  I'm in awe, really.  Of course I have seen arched windows and domed buildings before, but this is something else!  I have read descriptions and watched video clips before, but somehow, this virtual tour beats all of those, as I'm looking at things on my terms.  There's something empowering about that, I think.
I "walked" up a flight of stairs, and looked down on the city.  I admire how they have used every piece of their building lots.  (I think the word is "admire."  Perhaps I am appalled, really, that they have left no garden, not even a strip of lawn in the front.  That gives me a hint at the cost of real estate, I suppose.)

I think this evening marks the first of many virtual adventures!

Where shall I go tomorrow?  Brunei?  Paris?  Aruba?  Oh the opportunities abound!!  The best part of all is that I can revisit my favourite places time after time.  I would much rather visit these places properly, and actually walk up the stairs, board the ferries, and hike up the mountains.  But until I get to go in person, my bank account remains in-tact;  my passport remains in a safe;  body clock remains on Pacific Time....


Sunday 26 January 2014

The pictures below are of my first (and only) quilting project so far.  A friend brought me these eight pictures and asked me to sew them into a quilt for her.  I'd sewn before, obviously, but I had never quilted before, so I did some research online on how to quilt a wall-hanging.  Next, I researched what colours to use as background colours.  Regrettably, I am not artistic at all, so, yes, I did actually have to look that up.  The suggestions I found boiled down to this:  choose something with texture, in the same "era theme" as the subject pictures.  Hmm....  I found this textured-looking quilting cotton which seemed to fit the descriptions.  

I hope that my friend likes her quilt, as this sure was a time-consuming project!!!  Not sure I'm signing up for a quilting project again!!  I photographed this quilted wall-hanging using a couple of different features on my camera.....


Sunday 19 January 2014

This purse is an example of the lesson that sewing has attempted to teach me many times, but which I still have not learned.  The lesson is that unless I know EXACTLY how to construct an item, I should not attempt it without a pattern.  Alas, I often think I know better, and attempt it anyway.  Usually I am dissatisfied with these kinds of projects.  This purse was no exception....  Here's the story behind it...

Our Church organised a lovely event following the Royal Wedding.  We had our own "Royal Tea Party," where we all dressed up all nicely, wore nice hats, drank tea, and ate dainty tea party treats.  Characteristically, I decided to make a dress for the event, and to round off my outfit with a matching purse.  (More on the construction of the dress on a different blog posting - I might get to that at some point!!)  Anyway, my arrogant side said, "how hard can it be to make a purse?  Surely it's just a flap, and a box thing?"  So, that's what I made...  a flap and a "box thing."  It resulted in a terrible purse.  Terrible.  Almost useless.  Well, It didn't fold down properly, so I put wire into the edges, then it curled all funny, wouldn't lie flat, wouldn't open nicely, didn't fasten properly, curved in the middle when I put anything more than a tissue in, dragged down in the middle and popped right open when I put my car keys in.  In other words, it was completely useless as a purse.  However, I used the purse on that occasion.  I disliked it, but thought that there was hope for that purse, that it just needed some "reworking."  Good thing I didn't discard it!

More than a year went by.  Then I made the clutch purse, as just that ONE purse had taught me a whole lot about purse construction that I had never known before.  I took my rugged attempt at a purse apart, changed the corners on the inside, changed how I added the lining, changed how the flap was attached, changed how I incorporated the interfacing (it had it before, but I used it differently this time), removed the wire (that always was a stupid idea, and I even knew that when I put it in originally), and changed how I added the handle.  By this time, I had also bought magnetic snaps (the sew-in kind, as I was still foolishly intimidated by the more professional type that I use now).

This purse took ridiculously long.  The first attempt probably took about four hours.  Taking the thing apart took about two hours.  Planning for the re-assembly probably took another couple of hours, and re-sewing the whole purse start to finish probably took another three hours.  This is outrageously long to spend on a simple clutch purse.  In retrospect, of course, I wish I'd just looked for a pattern to begin with, followed it properly, and would probably have been done, start to finish, in less than three hours.  But hind-sight is always 20/20, isn't it?

Regrettably, I did not take pictures of the failed first attempt.  This evening, however, I took pictures of the revised edition.  It's not too bad, if I do say so myself.  I don't know if I would repeat this one, but it certainly is usable now, holds its shape, and can carry its full capacity without opening.  I don't have a pattern for this one, but I do know how I did it.

So here is what it looks like now.


As you can see in the last picture, I was so chuffed with the addition of the little coin pouch from the blue party clutch purse, that I decided to make it sort of a "tradition" to add one to my future purse creations.  This one is slightly improved over the previous one, as it has lining that prevents raw edges.  

Added above is an extremely unflattering picture of what is actually a gorgeous dress that I made to wear for this party.  I just photographed it quickly to show that the top is identical to the purse, and the skirt part of the dress is pink with the same organza overlay as is on the top half of the dress and on the purse.  (It's not all one colour, because the dress was made of a failed attempt at a mid-shin-length skirt from a few months earlier made of plain pink satin, a rough draft of the top half of my wedding dress, and really large piece of organza from the remnants bin (I think there were about three metres, in two chunks in total).  I'll do a separate posting about this dress, complete with much more flattering pictures, in a separate blog post at some point.

As always, please feel free to comment about anything from this posting :)


The Party Simple Party Clutch

This is where purse sewing all began for me.  About a year ago, I discovered that I had accumulated a rather large box of remnants.  The remnants were, I judged, too large to throw away, but too small for any projects.  Then I began wondering what kinds of projects used small pieces of fabric.  I googled terms such as "small fabric projects."  (Yes, I laugh now at my lack of ideas and lack of terminology!)  I soon learned that the phrase I needed was "stash buster."  So I googled "stash buster ideas," and came across all sorts of purses.  I looked through a number of free patterns online, determined to find one that did not require me to make any purchases.  The whole point of this project was to use what I already had in my sewing box, and in my box of off-cuts.  This one seemed to fit the bill.....

http://www.sewmamasew.com/media/blog/SMSSimplePartyClutch.pdf

I didn't know what Peltex was.  At that point, I had only ever used two different types of interfacing....  the first was the very thin kind, which is on a permanent sale at Fabricland for $0.99 per metre in a bag.  The second isn't really interfacing at all, but is used as stiffening in Highland Dancing jackets and waistcoats;  it's actually cotton canvas.  Having made a few Highland dancing jackets and waistcoats, in the recent past, my box of off-cuts included cotton canvas.
I also didn't have a magnetic snap, but I did have a number of regular snaps, and figured I'd just use a largish one of those, and hope it works out.
So, I was all set!  The fabric I selected was a remnant of a blazer, skirt, and hat that I made as a Church outfit.  It's called "crepella," and is one of the nicest fabrics I have ever sewn.  I have no idea what it's made of, but if you encounter it, I recommend it for any of the aforementioned projects.

So, my purse...  here it is!


Okay, so you'll see I have a few variations here.  Firstly, the strap is longer.  That's purely a matter of personal preference.  I wear my purses cross-body, so I made the strap longer. Secondly, I added a bow.  (That was actually my reject one that I originally made for my Church hat, but didn't quite have the heart to discard, so it became a purse decor item!)  See, nothing ever wasted!!

Then you'll see my co-ordinating pieces :)  I made a little coin purse and a card purse to match.  The coin purse is the simplest thing ever:  it consists of two pieces of exterior (blue) fabric (each lined with a piece of white fabric, and a zipper, with a seam at the top and bottom (so, yes, there are rough edges inside).  The card folder is constructed similarly, but has a piece of boning in either side of the top, so that it sort of snaps open and closed.  I didn't use patterns for either of those;  they were just more or less to complete my set, and because I just HAPPENED to have a white zipper and two pieces of off-cuts of boning in that length in my box of remnants.  (I needed two zippers for other projects, but Fabricland sells three for $0.99, so I bought a white one, too, and it came in useful, as you can tell).  

So, that more or less got me hooked on purses!  What started off as a "what can I do with my pretty off-cuts?" became a year-long love of sewing purses.  (Except now I've actually invested in some purse-making supplies.....  magnetic snaps, more zippers, and, my recent friend, PELTEX!)  Maybe I should give this Party Clutch another go with the right stuff!

As an aside, that was an extraordinary use of four metres of crepella fabric....  blazer, skirt, hat, clutch purse, zippered coin pouch, and card pouch.  I'd admired that fabric for a few months before it finally came on sale (I was NOT prepared to pay $22 per metre!!)  


As always, I welcome questions, comments, etc. below :)

Saturday 18 January 2014

Second Amy Butler Blossom Bag (Full Sized)

This is the first purse that I have made to give to a friend.  It's also my first vinyl sewing project, and it took about nine hours to make.  
The last time I made this purse, I downsized the pattern.  This time, however, I made it according to its intended size (which is far too big for me, but the friend in question has a fairly large purse which she has wanted to replace for some time now).  I also thought that it makes most sense to review this pattern when making it to its original specifications.
So, my findings....
I made the same two modifications as last time:  I incorporated the flap into the lining sewing, as I find that looks neater.  I also sewed the handles on a little differently to the way the pattern intends.  I think my way looks better :)  
The other major modification here is that it's made of vinyl.  (I wanted to make it out of leather, but that's a bit pricey!!) So, a leather-look will have to do.  I'm quite pleased with the result.  I made the handles a bit longer than the pattern specified:  I think the pattern says to make them 73cm long, and I made them 80cm long, as I thought that would make the bag more comfortable to carry.  I notice that in some of the pictures, the handles appear to be of different lengths.  That's just a photographic flaw:  they are the same!  The recipient of this bag is a mom, so I made the lining out of tenting fabric, as it is durable and (importantly!) waterproof.  
The one flaw in this bag is, I hope, temporary:  there seems to be a dent in the front flap.  I am hoping that it dents out after some use.  Other than that, it's pretty well perfect, if I do say so myself.

Please share your opinions!


Monday 30 December 2013

Here's another of my sewing creations.  I made this one over the summer, and actually followed all the steps to the letter.  This is made using McCall's 6532 pattern.  (See http://mccallpattern.mccall.com/m6532-products-16314.php?page_id=104).  I made version A.  My only deviation from the pattern was that I didn't use Peltex, only because I couldn't find it anywhere in Abbotsford!  Only recently did I find that it IS at Fabricland, but just isn't labeled with a name on it.  And as I didn't know what the stuff looked like, I didn't recognise it on the shelf.  Now I know it's there, for sale for $6 per metre.  That sounds a bit steep for an interfacing, but when it comes down to it, you will find that it actually goes a lot further than fabric, because it doesn't have a grain line.  Anyway, this one is made using fusible fleece as interfacing.


Things I'd do differently next time.....

a)  This thing needs "feet."
b)  The bottom is attached to the side panels in two pieces, and splits down the centre.  I'd rather do it as one piece, and attach it first to one side then the other.
c)  Add false bottom.  I think that'll just finish it off better.
d)  Make elasticised inside pockets.  These ones don't hold anything three-dimensional, without bulging the exterior of the bag, so kinda pointless.
e)  I'd serge the top of the bag and the top panel before inserting.  I had to leave the inside edges unfinished, because I just could not get my sewing machine to sew the bias tape around the inside edges.  (Think about it:  you're trying to sew a bulky bag, sewing through two layers of fusible fleece, two layers of fabric, two layers of piping tape, all in a cramped corner (i.e. the sides of the bag).  It's not so much a question of thickness, but of awkwardness).  That part of the pattern is badly designed.
f)  The side panels are presently formed by folding a section of the front and back to meet in the middle.  This sort of works with fusible fleece, but won't make a nice edge for Peltex.  If I were to do this again, I'd cut a piece out of the Peltex where the fold is to be, to get a crisper edge.  Or, maybe I'd cut separate side panels, without the split.  This will require more thought, though, and some major pattern redesign.
g)  The lining of the top section should really be done in the same fabric as the exterior, especially if the colours are contrasting, as you end up with a bit of a border around the zipper.  I don't think this is a question of neatness, but just a fact about how to create the "space" for the zipper.  Alternatively, I might put the peltex onto the lining, rather than the exterior, so that the "frame" is on the inside rather than the outside, though that might create some puckers on the outside.  Hmm....  some rethinking to be done here, obviously, before doing it again.
h)  Not sure what those tabs are on the outside beside the zipper ends.  Kinda pointless, if you're not attaching a strap to it.  I will eliminate those next time, unless I also include a "D" ring on each side so that a strap can be attached, though not sure why anybody would want a strap, with such long handles.

I found the fabric requirements to be WAY off on this one!!  There was nowhere near enough fabric for this bag, even though I followed the fabric requirements, and had to go back to get more to do the lining.  When I did, I could not find any more of either the exterior or the contrast (which I used for the handles and the bottom), so had to use something else in the interior.  I chose something that looks like sea sand, so it's still lovely.

I made this bag as a weekend away kind of bag.  Sometimes (in warmer weather!) I head off to Kelowna for a weekend, and my hand luggage sized suitcase seems like overkill for a couple of days, whereas the bag I use as a gym bag is a tad small.  This one does the trick, and holds a pair of shoes, too.  (Not winter boots, but will hold a couple of changes of clothes, cosmetics bag, and a pair of sandals).

There aren't many reviews for this bag online.  It's one of the most difficult projects I've ever taken on, and it's NOT a perfect pattern, either.

Would I make this bag again?  Not sure.  It was definitely a challenging project.  There are LOTS of pieces, something like 50 steps on the instructions, and the pattern isn't exactly perfect, either.  I also don't really have a use for two of these.  Maybe I'd make one for a gift?  Did I mention that this bag is also expensive to make?!  Surprisingly, if memory serves (again, I did this in the summer, so maybe I'm a bit off on these), I believe it took three metres of fabric, plus three metres of fusible fleece (should have been 1.5m of fusible fleece and 1.5 metres of Peltex), plus a zipper of irregular length (had to special order that one).  So, it's not exactly a cheap project to make out of remnants.

I DO actually plan on making a smaller version of this bag to be used as a cosmetics/toiletries bag for travelling.  Unfortunately, it seems I won't be able to match the fabric, which is rather unfortunate, as a matching set would have been rather nice.  Ah, well....  the style will be matching.
But I quite like the style for a cosmetics bag.  In that case, I'll use fusible vinyl to make it waterproof, plus include the variations I've listed above.